
When I set out to create a Gyro Meat recipe, I assumed it would be a complicated process. At first, it was. It involved smushing a pulverized meat mixture into a loaf pan, then baking in a water bath before draining and weighing it down with a brick. A good deal of effort that led to a mediocre result. I was beginning to wonder if making gyro meat at home was worth it. But as you’ve already guessed: it is.

This post may contain affiliate links. Please read our disclosure policy.
With just a handful of ingredients and a clever method, it’s easy to make delectable, homemade gyro meat (pronounced YEE-roh). No fancy equipment or culinary degree required – just a few simple steps that transform everyday ingredients into that unmistakable, crave-worthy gyro flavor. (See my recipe video below – with more than 211,000 views on YouTube – to see the exact process.)
“I’m Greek and I approve! I moved to the country in upstate NY, and it’s difficult to continue finding authentic Greek food. So I tried this lamb gyro recipe, and its excellent! With or without the bacon, you will not be disappointed.”
angela
Table of Contents
Ingredients You Need to Make Gyro Meat

- Ground Lamb: The star of authentic gyros. Look for meat with a good balance of lean and fat. If lamb isn’t your thing, 85% lean ground beef makes a great substitute, or use a mixtyre of the two.
- Dried Oregano: Greek oregano is ideal here. It has a more pungent, earthy flavor than the Mexican variety. Either will work though.
- Ground Cumin: This warm, earthy spice adds depth to the meat. Make sure your cumin is fresh – old spices lose their potency.
- Onion: I prefer white or yellow onions for their sharp flavor. Choose one that’s firm with no soft spots. The papery skin should be intact and free of blemishes.
- Fresh Garlic Clove: Look for firm, plump cloves with tight, unbroken skin. Avoid any that are starting to sprout or feel soft.
- Bacon: This is a key ingredient for the best flavor and texture. Choose a good quality bacon – it makes a difference. The fat content helps keep the gyro meat moist and adds a subtle smoky flavor.
- Kosher Salt and Freshly Ground Black Pepper: As always, I recommend adjusting seasoning to your own taste. Some readers have found the version I like best a bit too salty – so if you’re concerned, start with less. You can always add more, but can’t take it away!The kosher salt’s larger grains distribute more evenly, and freshly ground pepper has a much better flavor than pre-ground.
Recipe Testing Notes
I came across this recipe from Serious Eats’, J. Kenji Lopez-Alt, who had tried and been disappointed with the same complicated recipe I followed on my first try. Applying the scientific approach he’s famous for, he simplified the process while improving the outcome. He found that: adding some fat (in the form of bacon), along with salting and chilling the meat mixture ahead of pureeing and baking, produced a reliably superior gyro meat, both in texture and flavor.
I admit my skepticism about free forming the meat puree into a rectangle on a baking sheet instead of pressing it into a loaf pan, imagining it disintegrating into a bubbly mess. But it holds together beautifully. He also added the clever step of broiling thin slices of the baked loaf to warm and crisp the edges. Not only does this add to the flavor and texture of the gyro meat, it transforms any leftovers into a 5 minute meal in the refrigerator just waiting for assembly.
Tips for the Best Texture and Flavor
Though I stuck with Kenji’s basic technique, I did make a few changes. I finely chopped the garlic and onion in the food processor before adding the meat mixture and bacon to avoid any chunks of onion in the finished meat. I also increased the amount of oregano and added a little cumin for flavor depth. And, because I love Tzatziki sauce on my gyros, I slathered it on instead of the yogurt and mayonnaise based sauce he suggests.
In my recipe testing, the gyro meat consistently took 35 minutes to reach 155˚F with an instant read thermometer (instead of the 30 minutes directed in the original recipe), but that could be a difference in ovens, so I’ve offered a range.
How to Make a Gyro
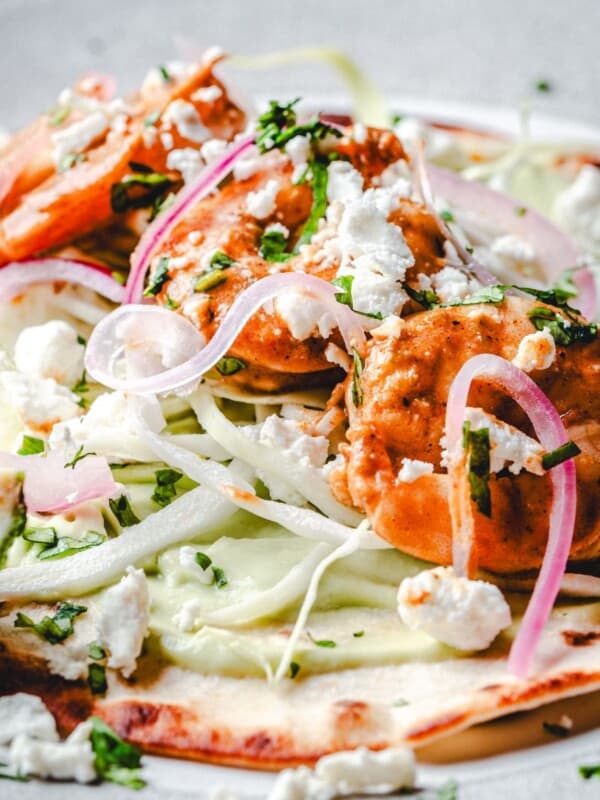
To make the perfect Gyro: start with soft, warmed pita bread spread with a thick layer of Tzatziki sauce. Pile on several broiled gyro meat slices and top with thinly sliced red onion (or pickled red onions) and chopped tomato. Or make this Gyro Bowl recipe instead!
More Delicious Mediterranean Recipes


How to Make Gyro Meat
Combine ground lamb with salt and spices in a medium bowl. Cover and refrigerate 1 hour.

Mince onion and garlic in food processor. Add cold meat mixture and bacon pieces; process until smooth, scraping down sides as necessary.


Preheat oven to 300˚F. With moist hands, shape meat mixture into a 8-inch long by 5-inch wide rectangle on a foil lined baking sheet. Bake for 30-35 minutes until center registers 155˚F on an instant read thermometer. Remove from oven and let rest 15 minutes before slicing.

Preheat broiler with oven rack adjusted to highest level. Slice loaf crosswise into 1/8-inch thick slices and arrange in a single layer on foil lined baking sheet. Broil 2 minutes until edges are crispy. Remove from oven and tent with foil.


Assemble gyros: Spread a thick layer of tzatiki sauce onto warm pita bread. Pile with gyro meat slices and top with thinly sliced onion and chopped tomato. Serve.

Video
Ingredients
- 1 pound ground lamb or 85% lean ground beef
- 2 teaspoons kosher salt see recipe note #1
- 1/2 teaspoon freshly ground black pepper
- 1 teaspoon dried oregano
- 1/2 teaspoon ground cumin
- 1/2 onion cut into 1-inch chunks
- 1 clove garlic sliced
- 3 ounces bacon cut into 1-inch pieces
Instructions
- To a medium bowl add lamb, salt, pepper, oregano and cumin. Mix with your hands until thoroughly combined. Cover and refrigerate 1 hour.
- Preheat oven to 300˚F.
- Add onion and garlic to the bowl of a food processor and pulse several times to mince; scrape down sides with a rubber spatula. Add lamb mixture and bacon pieces; process to a smooth puree, scraping down sides as necessary.
- Line a baking sheet with foil. Transfer meat mixture to center. Wet hands and form meat into a rectangle, approximately 8-inches long, 5-inches wide and 1 1/2-inches high.
- Bake 30 to 35 minutes until an instant read thermometer reads 155˚F. Remove from oven and let stand 15 minutes before slicing.
- Adjust oven rack to highest position and preheat broiler. Line baking sheet with foil.
- Transfer loaf to a cutting board and carefully slice crosswise into 1/8-inch thick slices. Arrange slices on prepared baking sheet, leaving a little room between each one. Broil 2 minutes, until slices are hot and edges are crispy. Remove from oven and tent with foil.
- Serving Suggestion: Warm pita bread and spread with a thick layer of tzatziki sauce, pile on gyro meat slices and top with thinly sliced onion and chopped tomato.
Notes
- Some readers have found this recipe too salty (others think it’s just right). If you tend to like less salty foods, I recommend making this recipe the first time with 1 teaspoon of kosher salt instead of 2. You can always add more seasoning before serving.
- Note that nutrition information does not include pita or toppings.
- An easy way to warm pita bread is to broil on a baking sheet for 30 to 45 seconds per side.
Nutrition
Nutrition information is automatically calculated, so should only be used as an approximation.


This was fantastic! I must admit I was a little skeptical about bacon and cumin, but as Sallie commented,”just roll with it”… and I’m so glad I did. Would not, and did not, change a thing. Thanks for this GREAT recipe!
So glad you trusted the recipe, Margie! The bacon and cumin combo really works. Thanks for trying it!
This is truly amazing! Authentic gyro flavor. I followed the recipe exactly. Diced it instead of sliced It then broiled it to add to Greek salad. Highly recommend.
That’s wonderful to hear, Tracey! So glad you enjoyed this.
I’m Greek and I approve! I moved to the country in upstate NY, and it’s difficult to continue finding authentic Greek food. So I tried this lamb gyro recipe, and its excellent! With or without the bacon, you will not be disappointed.
You comment made my day, Angela! Thank you.
Is there an alternative to the bacon? I have no more:(
Hi Tina! If you can find a high fat ground beef or ground lamb (20%+) it should be enough fat to hold the mixture together.
Question: can I bake the “loaf” of gyro meat and then freeze it?
Thanks
Hi Juanita! Yes, absolutely. I recommend cutting the loaf into one-meal portions before freezing, so you can thaw just the amount you need.
Delicious,! Great recipe and so easy to make.
So glad you enjoyed this, Matt!
Tried both with lamb and ground beef. Both amazing and good recipe. Going to keep this one, well done!
That’s wonderful to hear, Brian! Thank you for coming back to let me know.
Question: What if I have no food processor and I tried my vitamix blender….blended the bacon, onion and garlic…took it out to layer with the beef/moose (no lamb in my freezer in interior AK) and half way through my almost new vitamix blender just stopped working 😳😆😭😳😬
I took out my kitchen aid hand mixer and mixed it all that way…will see if it was enough 🙏🙏🙏
oh boy…that is a predicament! I hope it turned out well, Amber.
Used 100% ground moose instead of lamb and beef. And its awesome and enough using my hand mixer. Delicious.
yeah
Lessons Learned:
Do NOT skimp on blending up that meat. Repeat. Triple Emphasis.
Same goes with pressing the meat down.
Them two things are so critical for the texture. The recipe states this… but i’m just elaborating from experience lol. Blend it SMOOTH.
Lastly – Lamb is essential. I read one comment about someone not wanting lamb, and that is perfectly fine… and it tastes good still. I also think the beef is drier. If you use beef… try going for 80/20 maybe. The bacon I used didn’t quite have the fat content I needed.
If you are used to “normal” Gyro meat and you opt for Beef + Bacon… You will clearly notice the difference in flavor/texture.
Excellent recipe. Don’t skip the things I said. Lamb heavily preferred.
Love this, Mike! Thank you for your detailed cooking notes.
Our son and daughter made gyros for us on our last visit, SO good I asked for the recipes for both meat & tzatziki. As I read through the recipe and comments about salt, I got to thinking the saltiness issue may have to do with the bacon used, as some are more salty than others. Hence some meat being saltier than liked?
I’m so glad you and your family enjoyed these, Trae! Yes, you’re absolutely right about how much bacon varies in saltiness and I’m sure that’s a factor.
I had high hopes for this recipe and it did not disappoint. This is one of those recipes that you question the combo of ingredients. You think, “Bacon and cumin?”. Just roll with it and live your life. I served with the usual pita/gyro toppings with some turmeric rice on the side. It was a kid pleaser, too. Both had seconds. I doubled the recipe, cooked half and froze the other half for later.
Fantastic, Sallie! So glad you and your family enjoyed this!
Loved it, easy, cut in half for me and my husband! Would not change a thing. Next time we will make our own tzatziki sauce! We found lamb to expensive and the ground beef worked great.We live in a small town with no gyros, so love we can make it!
I love to hear this, Barb! So glad you enjoyed it and thank you for your cooking notes.
Definitely will make again!!! We all LOVED it! Even my 1 year old!! So yummy! Thank you so much!
That’s fantastic, Tracy! Thank you for coming back to let me know.
Absolutely delicious recipe that I will be making for many years to come.
Thank you, Coco! I’m so glad you enjoyed it!