
If you’ve wondered how to make Homemade Ramen Noodles, you have to try this! Through trial and error, I’ve developed a reliable recipe for making ramen noodles from scratch that works every time. And they freeze beautifully, so make a big batch to use in all of your favorite Ramen Noodle Recipes!
There’s a simple reason why it took me several tries to perfect this recipe: I’m terrible at scooping flour from a bag accurately. I learned this about myself long ago when it came to baking cookies, cakes, and bread. But it took me a few failed attempts at ramen noodles to realize that I needed the flour weight to have a reliable recipe.

This post may contain affiliate links. Please read our disclosure policy.
The first recipe I tried was from my friend, Lorraine, of Not Quite Nigella. Her recipes are reliably excellent and the ramen was no exception – the noodles tasted delicious! But sometimes the dough would come out of the pasta cutter as separate noodles, other times as a blob. Not a recipe problem, a flour scooping problem.
Then I came across a ramen noodle recipe from Lucky Peach and was excited because it had ingredient weights and a bonus science project of soda baked in the oven to create an alkaline salt, i.e., changing sodium bicarbonate to sodium carbonate. This sounded very official, so I tried it.
There was good news and bad news: the good news was that the ramen dough flowed easily through my pasta cutter; the bad news was that, when cooked, the noodles had such a strong alkaline flavor that we threw them away. If you’ve had cookies or rolls made with too much baking soda, you know the flavor I’m talking about.

Since the texture of the Lucky Peach ramen worked, but I loved the flavor of Lorraine’s noodles, I decided to try a combination. This is a true hybrid with elements of both recipes. I used all-purpose flour as recommended by Lucky Peach, but did away with the baked soda and used Lorraine’s combination of baking soda and egg to give the noodles that essential springy ramen noodle texture. A few tries gave me a reliable formula of flour weight to liquid volume.

As you’ll see in the video below, I used my stand mixer to stir and knead the dough. Let me warn you that this is a fairly dry dough and you’ll be giving your stand mixer a workout. You may even need to steady the mixing bowl as it kneads, i.e., don’t leave the room or you may end up with the mixer running and the bowl on the floor.
Of course you can knead the dough by hand, but know that you’ll break a sweat: knead for 5 minutes, let the dough rest for 20 minutes and then knead it again before refrigerating. Either way the noodle payoff will be worth it, I promise.
Once your dough is ready, you’ll roll it through a manual pasta machine – this is the one I have. Then use the same machine to cut the ramen noodles. You can either cook them immediately or freeze them for later.
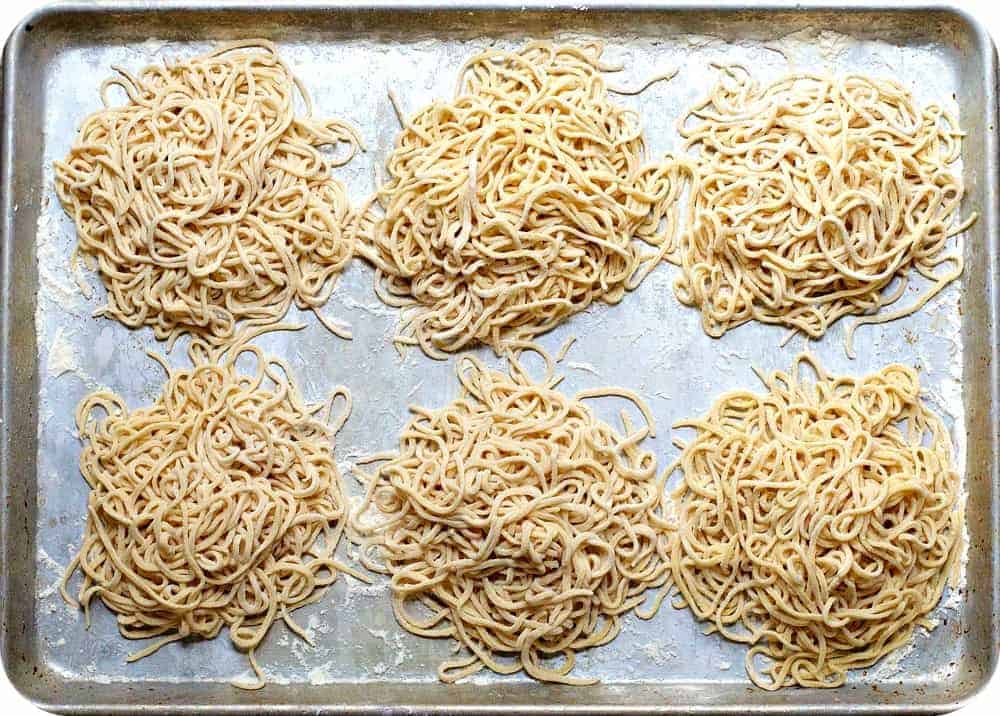
To freeze ramen noodles, place them on a floured baking sheet in loose mounds that are about 2-servings each, as pictured above. Cover and freeze until solid. Once frozen, carefully transfer to a gallon-size freezer bag or other lidded freezer safe container. No need to thaw before cooking.
This batch makes 8 to 12 servings, depending on how you use them (10-12 if you’re making soup, 8 to 10 for stir fry). I recommend trying them in this Pork Belly Ramen, Birria Ramen, Homemade Ramen (my easiest version), Shoyu Ramen, Miso Ramen, Shrimp Ramen or with Miso Ramen Broth or Shoyu Ramen Broth topped with crisped slices of pork belly or Chashu Pork, Menma and Soy Sauce Eggs.
How to Make Homemade Ramen Noodles
Step 1: Combine whisked dry ingredients and eggs in the bowl of a stand mixer with dough hook attached. Mix until combined; continue mixing to knead dough, 5 minutes or until dough is smooth.


Step 2: Wrap dough and refrigerate for at least 1 hour (but not more than overnight – see recipe note #3.).

Step 3: Dust baking sheet with flour and divide dough into 6 equal pieces.

Step 3: Run one piece through the thickest setting on a manual pasta machine. Repeat three more times, turning the dial to a thinner setting each time. Cut dough in half crosswise. Attach finest cutter to pasta machine and run dough through to cut. Dust with flour to coat and gently separate noodles and place on prepared baking sheet. Repeat with remaining dough.


Step 4: Cook noodles for 1 to 2 minutes in water or broth until cooked through. Note that you can also freeze the noodles – just add to boiling liquid directly from the freezer and cook about 30 seconds longer than when fresh.

Video
Ingredients
- 3 cups all-purpose flour 408g
- 1 teaspoon fine sea salt
- 1 teaspoon baking soda
- 2 large eggs beaten
- 1/2 cup warm water
Instructions
- Whisk together flour, salt and baking soda in the bowl of a stand mixer. Add eggs and warm water.
- Set bowl in place on a stand mixer and attach dough hook. Mix at the lowest speed until all ingredients are moistened. Increase speed one or two clicks and mix until dough comes together. Once a dough ball has formed, continue to knead with dough hook for 5 minutes, until dough is smooth. (Recipe Note #2)
- Turn dough out on to a floured surface and shape into a rectangle. Cover with plastic wrap and refrigerate for at least 1 hour (but not more than overnight – see recipe note #3).
- Dust a rimmed baking sheet generously with flour.
- Remove dough from refrigerator and divide into 6 equal pieces on floured work surface and cover loosely with plastic wrap. With your palm, flatten one piece into a rough rectangle about 1/2-inch thick; rub all over with flour. Feed one end through a manual pasta machine, beginning at the thickest setting (1). Turn dial to the next setting (2) and run dough through again. Repeat at the next two settings (3 and 4). (For a shorter ramen noodle, cut the dough in half crosswise before running through the pasta cutter.)
- Attach pasta cutting attachment and dust the blades lightly with flour. Run dough through finest cutter (spaghetti-sized ideally). (Recipe Note #4) Dust noodles with flour to coat and separate and place on prepared baking sheet. Repeat with remaining dough pieces.
- Cook noodles for 1 to 2 minutes in a generous amount of water or broth until cooked through. You can also freeze the noodles. They can be added to boiling liquid directly from the freezer and cook about 30 seconds longer than when fresh.
- Use noodles in your favorite soups and stir-frys!
Notes
- To knead the dough by hand: once you’ve stirred the ingredients together, turn out onto a floured surface; knead for 5 minutes, cover the dough and let it rest for 20 minutes; then knead again for 5 minutes then refrigerate.
- If dough seems to be taking too long to form a ball, don’t add more liquid. Instead, turn off the mixer and use your hands to press it into a ball then continue with recipe.
- As with all fresh pasta, the dough will start to oxidize and turn a green / gray if left in the refrigerator for 18 or more hours. So be sure to make the noodles and use or freeze before then, as directed in the post.
- If your noodles start to clump when cutting, check the attachment underneath to make sure that dough isn’t building up between the teeth. If dough is building up, use the dry brush that comes with manual pasta makers (or a dry pastry brush) to wipe away any residual dough. Be sure to coat each section of dough with flour before running through cutter to avoid this issue.
- This recipe serves 10-12 if you’re making ramen noodle soup. If you’re making a noodle stir-fry or other dish where noodles are the bulk of the dish, it will serve 8 to 10.
Nutrition
Nutrition information is automatically calculated, so should only be used as an approximation.


This might be counter-intuitive, but I was wondering if you’ve tried using freshly ground, whole wheat flour for these noodles? I’m trying to use as many homemade and fresh ingredients as possible in my cooking, and trying to exclude white flour where I can.
Hi Eliza. It’s not counter-intuitive at all, it’s a great idea! Unfortunately I haven’t tried it myself and the only concern I have is the texture, how well it will work to roll it out and run it through the pasta cutter. If you’ve ever tried to make a pie crust with only whole wheat flour, you know what I mean. 😉 If I were trying it, I would start with a small ratio of whole wheat flour, maybe 1/4 WW to 3/4 A/P and you may need a bit more liquid. Good luck! If you try it, I’d love to hear how it goes…
This came out perfect. Thank you for posting this!!
Yay!! Thank you so much, Megan!
Hello!
i’m a ramen fanatic, but i’m also thinking of going on a low carb diet
have you tried using Squash Flour instead of all purpose?
I was thinking if it was a feasible replacement
Can this be used in a machine to make *shaped* pasta? (I have the pasta attachment for my stand mixer and want to try it)
Hi Toni…if you mean an attachment that cuts the dough into long noodles, it should work great! I’m not sure about short pasta shapes (rotini, penne, etc.) because I haven’t tried it. I’d love to hear how it goes. 🙂
Hi Marissa – I made these for tonight’s dinner and they came out awesome! Thanks for the recipe. I too am measurement challenged and always appreciate when weights are listed. I also keep a spray bottle of water nearby to add just a bit of moisture (if required) to compensate for humidity and “egg size.”
.
So glad you enjoyed them, Ken! Spray bottle is a great idea…
Hello!
Have you tried playing around with this recipe and making these ramen noodles spinach or kale noodles?
If you have- I’d love a suggestion with adjusting water content!
Hi there, Ylan! I haven’t tried adding greens to this recipe, but it sounds delicious! Sorry I don’t have recipe adjustments to suggest…If you end up giving kale or spinach a try, I’d love to hear how it goes.
Hi Marissa,
For the first time, I am comenting on a blog….You really deserve a special note for this recipe that finally worth the time spend on it. Noodles who doesn’t stick togheter, are not too salty and doesn’t become smooshie in the broth.
Great job!
What an honor – thank you for your comment, Sophie! I’m so glad you’re enjoying the noodles!
My daughter is a picky eater but loves ramen. However, reading the label of most packaged ramen brands is like reading Stephen King’s chemistry notes. How amazing to finally find a wholesome and easy recipe that is spot-on flavor-wise!
Note: I have a Kitchen Aid heavy duty stand mixer with the pasta roller and cutter attachments, and consider this equipment pretty essential if one wants to make this recipe regularly.
Thank you so much, Barbara’s. I’m so glad you’re enjoying this recipe! I agree that a sturdy mixer is important for making it.
I made these by hand and the recipe is excellent!! Perfect, perfect noodles! I make ramen on a regular basis but the dried noodles just lacked a little something. These were amazing! Thank you!!
That makes me so happy, Ashley!! Thank you! 🙂
Hi- i am JUST learning how to cook… and I am a self doubter when trying something new… when you said “made by hand” does that mean you hand kneaded it and omitted a mixer or does that mean you didn’t use a pasta machine?
I have a mixer but not a pasta machine- I was going to *try* this. Thanks for any info you can give me!
Hello! I did not use a mixer. I did use a pasta machine. I think it can be rolled by hand, but it would take quite a bit of effort to get it as thin as it needs to be. Maybe let it warm up first after refrigeration. I would still try it, even if they are a little thicker, they are incredible!!
I got my pasta machine at the thrift store for $12, haha. Good investment.
My pasta roller has NEVER cut noodles without sticking together in a clump. However, this recipe was a success! Thank you.
On a side note, we experienced the litmus test effect while cooking the soda-enhanced noodles in some broth that had purple cabbage. The noodles turned greenish blue! #Chemistry!
That’s fantastic, Becky! I hear you about the pasta machine clumps…having flour weight is so helpful for repeatable homemade pasta and baking recipes. Like your litmus test effect, all about the science, haha. 😊
This recipe worked well for me. I did end up using a little more water than it called for- I’m talking teaspoons, though, not even quarter cups. It just didn’t seem to be coming together, so I added water to the mixer tiny dribbles at a time, and finally it was willing to pull together into a ball rather than shredding into crumbs.
I cooked the noodles for about a minute and a half in chicken broth and then stir fried them with green onions and ginger. The result was very nice. Thank you for the recipe!
So glad that you enjoyed the noodles, Ben! I include flour weights to make this kind of recipe as repeatable as possible, but there are so many variables – nice work in recognizing that your batch needed a little extra water.
do you have any ideas for sauce?
Hi Niccly – these are great in brothy soups like this Pork Belly Ramen and you can also use them, once they’re cooked in dishes like this Ramen Noodle Stir Fry.
OH.MY.GOODNESS!!! I was in search of a more authentic recipe that the one that I got from a recent cooking class at name brand store. Yours is a thousand times better hands down. I was making the family tonight and decided I had better sample the noodle before presenting to them. Now the problem is going to be to not eat another batch before supper time. Thank you thank you.
Diana, I love to hear that!!! Thank you so much for coming back to let me know. 🙂
Perhaps it might be seen as counterintuitive but do these noodles stand up to being dried? I would suspect they do since the only thing that seems to really differentiate it from the italian pasta I make is some baking soda, but it’s not mentioned one way or another.
Hi Matt. 🙂 I haven’t dried them, but I don’t see why you couldn’t. I always just portion them out and pop them in to the freezer.
Hi Marissa – any suggestions if I only have a hand mixer & not a standing mixer? Thank you!
Hi Anna – Sure! No need for a stand mixer, it’s primarily doing the kneading. To knead the dough by hand: once you’ve stirred the ingredients together, turn out onto a floured surface; knead for 5 minutes, cover the dough and let it rest for 20 minutes; then knead again for 5 minutes then refrigerate.
Thank you! Can’t wait to try it out.
Quick question: Is the baking soda you used the “Baked Baking soda”? About to try this tonight! Thank you so much for your hard work in this. Now I have to work less lol
Hi Anthony! It’s just regular baking soda – not baked. Enjoy!