
If you’ve wondered how to make Homemade Ramen Noodles, you have to try this! Through trial and error, I’ve developed a reliable recipe for making ramen noodles from scratch that works every time. And they freeze beautifully, so make a big batch to use in all of your favorite Ramen Noodle Recipes!
There’s a simple reason why it took me several tries to perfect this recipe: I’m terrible at scooping flour from a bag accurately. I learned this about myself long ago when it came to baking cookies, cakes, and bread. But it took me a few failed attempts at ramen noodles to realize that I needed the flour weight to have a reliable recipe.

This post may contain affiliate links. Please read our disclosure policy.
The first recipe I tried was from my friend, Lorraine, of Not Quite Nigella. Her recipes are reliably excellent and the ramen was no exception – the noodles tasted delicious! But sometimes the dough would come out of the pasta cutter as separate noodles, other times as a blob. Not a recipe problem, a flour scooping problem.
Then I came across a ramen noodle recipe from Lucky Peach and was excited because it had ingredient weights and a bonus science project of soda baked in the oven to create an alkaline salt, i.e., changing sodium bicarbonate to sodium carbonate. This sounded very official, so I tried it.
There was good news and bad news: the good news was that the ramen dough flowed easily through my pasta cutter; the bad news was that, when cooked, the noodles had such a strong alkaline flavor that we threw them away. If you’ve had cookies or rolls made with too much baking soda, you know the flavor I’m talking about.

Since the texture of the Lucky Peach ramen worked, but I loved the flavor of Lorraine’s noodles, I decided to try a combination. This is a true hybrid with elements of both recipes. I used all-purpose flour as recommended by Lucky Peach, but did away with the baked soda and used Lorraine’s combination of baking soda and egg to give the noodles that essential springy ramen noodle texture. A few tries gave me a reliable formula of flour weight to liquid volume.

As you’ll see in the video below, I used my stand mixer to stir and knead the dough. Let me warn you that this is a fairly dry dough and you’ll be giving your stand mixer a workout. You may even need to steady the mixing bowl as it kneads, i.e., don’t leave the room or you may end up with the mixer running and the bowl on the floor.
Of course you can knead the dough by hand, but know that you’ll break a sweat: knead for 5 minutes, let the dough rest for 20 minutes and then knead it again before refrigerating. Either way the noodle payoff will be worth it, I promise.
Once your dough is ready, you’ll roll it through a manual pasta machine – this is the one I have. Then use the same machine to cut the ramen noodles. You can either cook them immediately or freeze them for later.
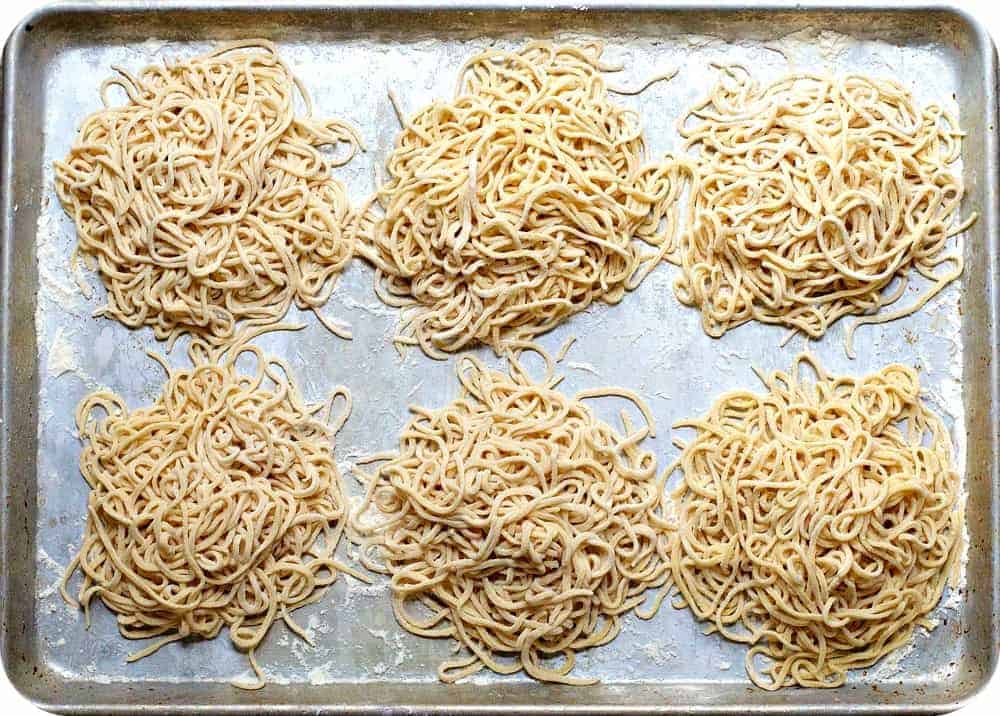
To freeze ramen noodles, place them on a floured baking sheet in loose mounds that are about 2-servings each, as pictured above. Cover and freeze until solid. Once frozen, carefully transfer to a gallon-size freezer bag or other lidded freezer safe container. No need to thaw before cooking.
This batch makes 8 to 12 servings, depending on how you use them (10-12 if you’re making soup, 8 to 10 for stir fry). I recommend trying them in this Pork Belly Ramen, Birria Ramen, Homemade Ramen (my easiest version), Shoyu Ramen, Miso Ramen, Shrimp Ramen or with Miso Ramen Broth or Shoyu Ramen Broth topped with crisped slices of pork belly or Chashu Pork, Menma and Soy Sauce Eggs.
How to Make Homemade Ramen Noodles
Step 1: Combine whisked dry ingredients and eggs in the bowl of a stand mixer with dough hook attached. Mix until combined; continue mixing to knead dough, 5 minutes or until dough is smooth.


Step 2: Wrap dough and refrigerate for at least 1 hour (but not more than overnight – see recipe note #3.).

Step 3: Dust baking sheet with flour and divide dough into 6 equal pieces.

Step 3: Run one piece through the thickest setting on a manual pasta machine. Repeat three more times, turning the dial to a thinner setting each time. Cut dough in half crosswise. Attach finest cutter to pasta machine and run dough through to cut. Dust with flour to coat and gently separate noodles and place on prepared baking sheet. Repeat with remaining dough.


Step 4: Cook noodles for 1 to 2 minutes in water or broth until cooked through. Note that you can also freeze the noodles – just add to boiling liquid directly from the freezer and cook about 30 seconds longer than when fresh.

Video
Ingredients
- 3 cups all-purpose flour 408g
- 1 teaspoon fine sea salt
- 1 teaspoon baking soda
- 2 large eggs beaten
- 1/2 cup warm water
Instructions
- Whisk together flour, salt and baking soda in the bowl of a stand mixer. Add eggs and warm water.
- Set bowl in place on a stand mixer and attach dough hook. Mix at the lowest speed until all ingredients are moistened. Increase speed one or two clicks and mix until dough comes together. Once a dough ball has formed, continue to knead with dough hook for 5 minutes, until dough is smooth. (Recipe Note #2)
- Turn dough out on to a floured surface and shape into a rectangle. Cover with plastic wrap and refrigerate for at least 1 hour (but not more than overnight – see recipe note #3).
- Dust a rimmed baking sheet generously with flour.
- Remove dough from refrigerator and divide into 6 equal pieces on floured work surface and cover loosely with plastic wrap. With your palm, flatten one piece into a rough rectangle about 1/2-inch thick; rub all over with flour. Feed one end through a manual pasta machine, beginning at the thickest setting (1). Turn dial to the next setting (2) and run dough through again. Repeat at the next two settings (3 and 4). (For a shorter ramen noodle, cut the dough in half crosswise before running through the pasta cutter.)
- Attach pasta cutting attachment and dust the blades lightly with flour. Run dough through finest cutter (spaghetti-sized ideally). (Recipe Note #4) Dust noodles with flour to coat and separate and place on prepared baking sheet. Repeat with remaining dough pieces.
- Cook noodles for 1 to 2 minutes in a generous amount of water or broth until cooked through. You can also freeze the noodles. They can be added to boiling liquid directly from the freezer and cook about 30 seconds longer than when fresh.
- Use noodles in your favorite soups and stir-frys!
Notes
- To knead the dough by hand: once you’ve stirred the ingredients together, turn out onto a floured surface; knead for 5 minutes, cover the dough and let it rest for 20 minutes; then knead again for 5 minutes then refrigerate.
- If dough seems to be taking too long to form a ball, don’t add more liquid. Instead, turn off the mixer and use your hands to press it into a ball then continue with recipe.
- As with all fresh pasta, the dough will start to oxidize and turn a green / gray if left in the refrigerator for 18 or more hours. So be sure to make the noodles and use or freeze before then, as directed in the post.
- If your noodles start to clump when cutting, check the attachment underneath to make sure that dough isn’t building up between the teeth. If dough is building up, use the dry brush that comes with manual pasta makers (or a dry pastry brush) to wipe away any residual dough. Be sure to coat each section of dough with flour before running through cutter to avoid this issue.
- This recipe serves 10-12 if you’re making ramen noodle soup. If you’re making a noodle stir-fry or other dish where noodles are the bulk of the dish, it will serve 8 to 10.
Nutrition
Nutrition information is automatically calculated, so should only be used as an approximation.


Hi Marisa, How does one freeze the noodles without the noodles losing their form.. I use a Food saver and I am worried the noodles will be flattened. Looking forward to making the noodles. My Marcato is on the way. ETA: tomorrow. Thank you in advance, Bonnie
Hi there, Bonnie! Great question and I need to add directions to the post – thank you. I separate the noodles into mounds on a baking sheet that are about 2 servings (see photo above) and freeze them until solid. Then I gently transfer them to a gallon size freezer bag – no need to thaw before cooking.
I also tried the alkaline ramen recipe first and had to throw the noodles away due to the strong taste. I used a little of the baked baking soda mixed in with the regular with your recipe. It worked very well. I had to add a very small bit of water to get the dough to stick. Used my upright mixer with attachments and everything turned out great. Very happy and will be using this again. Thank you!
Thanks for sharing your experience, Vanessa. As you know, I had the same response to the alkaline ramen – the taste of the baked soda was just too pungent. So glad that you enjoyed this recipe!
The noodles were delicious! I made half of the recipe and it was just enough for 3 people.
I even made the mistake of not wrapping with cling wrap, and then leaving it overnight, so the dough was rather hard… But fortunately it still came out great!
I’m so glad you enjoyed these, Hadia! Thank you for letting me know!
Thank You. I had so much fun making these noodles. I would post a picture of what I made with them but there is no option for that.
Hi, Kelli! I’m so glad!! I’d love to see what you made. If you post it to Instagram or Facebook, please tag me, @pinchandswirl 😊
Good recipe but I wouldn’t call it ramen noodles. There should be an alkali substance added like sodium carbonate. The reaction with the water and bread flour is what creates the pale yellow color, not eggs. But that said this isn’t a bad recipe or anything, I just googled looking for a ramen recipe (hoping to get one using alkali reaction) and this came up as the first result which confuses me.
Hi there, Kate. After making these ramen noodles with baked soda (sodium carbonate) and then with baking soda – both alkaline – I much prefer the baking soda version. Both have that signature springy texture, but the noodles taste much better made simply with baking soda. I hope you’ll give them a try both ways. I’d love to hear what you think!
Greetings Marissa! My 12 yr. old son is super picky but since he’s into Japanese anime he’s smitten with the idea of Ramen. He’s tried it once at Johnny Noodle King in Detroit and loved it but wants me to help him home-make it. I found your recipe and decided to give it a try. It was a total JOY getting him to finally be interested in helping me cook something. I let him do most of it. I took some great pix and will remember our bonding moments always.
Kudos on the perfection process. I was a little scared to use baking soda for fear of a strange taste but it was nothing short of excellent! WE LOVED IT. Many thanks indeed!
I love to hear this, Peggy!! So glad that you and your son enjoyed making and eating these. So sweet of you to come back and let me know!
You’re so welcome. One more question, how long can the dough stay in the fridge? It’s been in there for just 19 hrs. I’m hoping it’s not too late to run it through the noodler and freeze.
Hi there, Peggy! The dough should be fine – just dust it generously with flour to ensure that it doesn’t stick in the pasta maker as you cut the noodles. 🙂
Great recipe and have made a number of times. Making another batch now, and use the Kitchenaid roller attachments.
We dry the noodles on coat hangers, not in clusters. Humidity in Brisbane doesn’t always allow for clusters to completely dry out!
Many thanks. Have had epic fails with other recipes.😂😂 H
I’m so glad you’re enjoying these, Heather! Thank you for coming back to let me know! 😊 + Drying on coat hangers is genius!!
Just an FYI, putting sodium bicarbonate ( baking soda) in the oven converts it from an organic compound into a inorganic one. Sodium carbonate is known as washing soda, for doing laundry. It’s not for eating. Ever. Glad you threw that batch away!!!
I should have saved the extra baked soda for my next load of whites! 😉
Nah, it’s fine.
Sodium carbonate (washing soda) is a fairly standard food additive used in noodles and mooncakes. It’s often used as an acidity regulator, raising agent or firming agent. Sometimes it’s replaced by potassium carbonate, but there’s nothing wrong with using it in food in small amounts.
I rinse in cold water after cooking otherwise they get somewhat slimy. The thicker noddle setting makes them easier to handle.
Hi, Martin! If your noodles are slimy, it’s likely that you’re not cooking them in enough liquid (the starch thickening the water and coating the noodles). Try increasing the amount of liquid you use to boil them and I bet your problem will be resolved. 🙂
What do I do if the dough just won’t stick no matter how much I kneed???
Great recipe btw!!!!!
Hi Rebecca! All I can say is keep at it! I make this dough in my stand mixer and it does take a bit for it to come together and become smooth. Hope your noodles turn out great!
Good recipe, we couldn’t make pur noodles super thin, but that just means we need to practice. The flavor was spot on.
I’m so glad you enjoyed them, Dulce! Thank you for coming back to let me know!
These look great, but in the end, wouldn’t they just be considered egg noodles instead of ramen noodles? I thought the higher alkaline content of the sodium carbonate was the essential difference between ramen noodles and other noodles. Yes, the egg adds flavor and color, and the extra kneading makes the dough more chewy, but I always thought that a higher alkaline water mixed with salt was the most important distinction. Thoughts?
Hi Jason, since baking soda isn’t a typical ingredient in egg noodles and is still an alkaline even when it’s not baked, I’m comfortable referring to these as ramen noodles.
Hi Marissa !
This looks like a super recipe ! I was wondering if you would know if I could freeze/store some of the noodles to use later? Do they have to be eaten fresh each time ?
Hi Cecilia! Yes, you can definitely freeze them! In fact, I usually make a double batch. You’ll want to portion them out on a baking sheet (scroll up the post to see a photo of what I mean), ideally on a sheet of parchment paper. Freeze the portions and then transfer to a large freezer bag. You can cook them straight from the freezer, no need to thaw. Just cook about 30 seconds longer. Enjoy!
May I know is it must use manual pasta machine? Can I use Kitchenaid pasta roller attachment? Will it be the same?
Thanks
Hi Tehdr. Yes, you can absolutely use the pasta making attachment. Just be sure to roll it to a thin sheet, 2mm or 1/16-inch, before cutting.
What is the result on manual type? Will it be round shape or more flat?
Because I saw a demonstration in Kitchenaid spaghetti attachment and the result came out it flat instead of round.
Thanks
Hi, Tehdr. With the manual machine, the noodles are more of a flat than a round.
I took a class on ramen noodles today. They used the Kitchenaid. They said to push the dough down to a pancake, then pinch the edges so they catch in the Kitchenaid cutters, starting with one pass on 2, one pass on 3 and one pass at 4. Then do a series of folds and re-entering into the machine until you have a rectangle. After around 6-7 passes (if you fold in half and put the dough into the pasta roller with the fold always vertical), you’ll get a rough rectangle. Then you can add the spaghetti cutter and cut the dough, and flour it.
Hi Marissa, Absolutely the best recipe I have used. Went through the past machine without any problems. They turned out wonderfully. Thank you!!
That’s wonderful, Thelma! Thank you so much for coming back to let me know!