
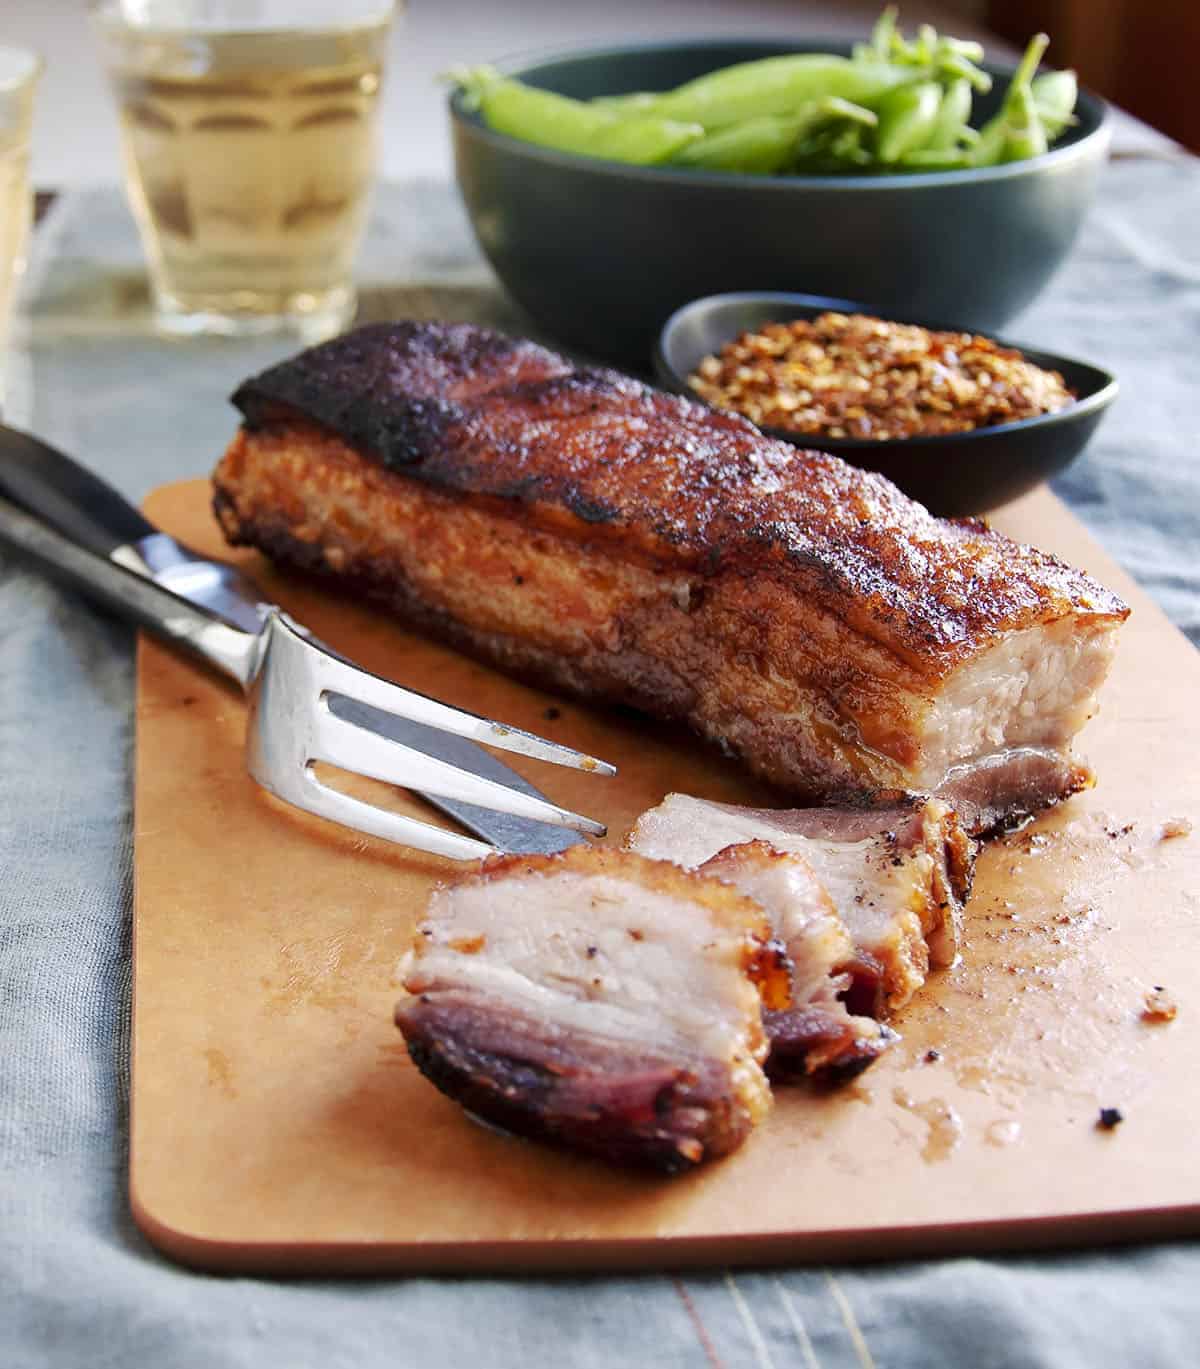
You need just 4 everyday ingredients to make Pork Belly that’s crispy on the outside, juicy and flavorful inside, and oh so versatile. It’s the kind of thing you taste in a restaurant and think it would be impossible to make at home – but it’s just the opposite. Enjoy it on its own, simply pan-fried, or as the star of countless dishes.

This post may contain affiliate links. Please read our disclosure policy.
If you’ve had poorly cooked pork belly (chewy or otherwise unpleasant), you know that technique is important. After experiencing the melt-in-your-mouth version at David Chang’s Momofuku Noodle Bar in New York City, I was determined to recreate it at home. I turned to his Momofuku: A cookbook, and to my surprise, the recipe was ridiculously simple. This version is the result of that journey: a foolproof method that delivers unbelievably succulent, crisp-edged slices; truly restaurant-quality pork belly every time.
This is a fantastic, simple recipe. I have made it twice now then also used your P.L.T sandwich recipe. It’s sinful! Thank you for sharing!!!
LINDSEY L
Table of Contents
- Ingredients for this Pork Belly Recipe
- Skinless vs. Skin-On Pork Belly
- Pork Belly, Side Pork, and Bacon
- Why This Recipe Works
- How to Cook Pork Belly: Skin-On or Skinless
- Pro Tips
- Variations and Serving Suggestions
- Make-Ahead and Storage
- Your Questions, Answered
- More Amazing Pork Belly Recipes
- Oven Roasted Crispy Pork Belly Recipe
Ingredients for this Pork Belly Recipe

- Pork Belly: skin-on or skinless (more on that below)
- Fine Salt: or twice the amount of kosher salt (Diamond Crystal brand, or an equal amount of Morton brand)
- Sugar: plain granulated white sugar
- Freshly Ground Black Pepper
Skinless vs. Skin-On Pork Belly

Chang’s original recipe calls for skinless pork belly, and that is the truest way to replicate the restaurant experience. However, this easy recipe also works beautifully with skin-on pork belly! The method of roasting, chilling, and pan-frying is the same for both.
With the skinless variety, you’ll skip the scoring and go straight to seasoning. With skin-on pork belly, you’ll need to score it before roasting. This helps the skin get a head start on crisping in the oven, a texture that becomes even more incredible after the final pan-fry.
A Quick Note on Serving Skin-On Pork Belly: While the chill-and-fry method is recommended for both, the 1-pound skin-on piece in this recipe can also be rested for 10-15 minutes after roasting and served immediately as a small roast for four.

Pork Belly, Side Pork, and Bacon
The terms pork belly and side pork mean the same thing. Look at the grocery store or ask your butcher for either and you’ll get the same cut of meat.
But don’t confuse pork belly with bacon. Pork belly is a fresh, thick slab of meat cut from the pig’s abdomen that hasn’t been cured or smoked. Bacon, though it’s usually made from pork belly, has been cured, smoked, and sliced. It can also come from less fatty back cuts. So while they start from a similar place, they end up as very different ingredients in your kitchen!

Why This Recipe Works
- Two-Stage Roasting: The recipe starts with a blast of high heat (450°F) to begin rendering the thick layer of fat and kickstart the crisping process. The temperature is then lowered to 275°F for a slow roast, which allows the tough connective tissues to break down, so the meat gets exceptionally tender.
- Overnight Dry Brine: Seasoning the pork belly and letting it rest overnight in the refrigerator adds flavor, but that’s not all. The salt draws moisture out of the belly, and that’s what you want for the crispiest edges.
- The Chilling Step is Key: Chilling the roasted pork belly completely is the step that gives you restaurant-quality results. It firms up the meat, so you can slice it into neat, thick pieces that won’t fall apart. This step also helps the slices crisp up beautifully in the pan without overcooking. (For the skin-on roast, this step is not required if serving immediately).
How to Cook Pork Belly: Skin-On or Skinless
Step 1: Score the Skin (if necessary): If you’re using skin-on pork belly, pat the skin very dry with a paper towel. Using a very sharp knife, make shallow diagonal cuts about 1/2-inch apart. Repeat in the opposite direction to create a diamond pattern. Cut through the skin and into the fat, but not so deep that you hit the meat. For skinless pork belly, you can skip this step.

Step 2: Season the pork belly all over with the dry rub of sugar, salt, and pepper, making sure to get it into all the nooks and crannies. Cover it and let it rest in the refrigerator overnight.


Step 3: The next day, preheat your oven to 450°F. Place the pork belly in a heavy, oven-safe pan or skillet (not a glass dish!) with the fat-side up. Roast on the middle rack for 30 minutes. Then, reduce the oven temperature to 275°F and continue to roast for another hour, or until the meat is tender but not mushy.


Step 4: Finish and Serve: Your final step depends on how you plan to serve the pork belly.
To Serve as Crispy Slices (Momofuku-Style): Remove the pan from the oven and let the pork belly cool to room temperature. Wrap it tightly in plastic and refrigerate it until completely chilled, at least a few hours or up to two days. Once chilled, slice into thick pieces and crisp up in a skillet to serve. (See serving suggestions below or use instead of bacon in recipes like Wedge Salad and Spinach Salad.)
To Serve as a Roast (for Skin-On Pork Belly): If serving right away, remove the pan from the oven and let the pork belly rest for about 10 minutes. Slice and serve to enjoy the freshly crispy crackling.


Pro Tips
- Plan Ahead: Despite the fact that you’ll only have a few moments of active time, you’ll want to start the process three days ahead. You’re essentially dry brining the meat and it needs an overnight stay in your refrigerator to take on all of that wonderful flavor. Then (ideally) you’ll refrigerate overnight again after roasting and before slicing and crisping.
- Dry Skin is a Must for Crispy Results: For skin-on pork belly, the skin must be completely dry before it goes into the oven. Pat it thoroughly with paper towels. The initial high-heat blast is also crucial for creating crispy bubbles.
- Don’t Undercook: The number one reason for tough pork belly is that it was undercooked. The low-and-slow portion of the cooking time is essential for breaking down tough connective tissues. If it’s still tough, it likely needs more time at the lower temperature.
- Use a Heavy Pan: A heavy, oven-safe skillet, such as cast iron, provides even, consistent heat, which helps the pork belly cook uniformly and the fat render properly.
Variations and Serving Suggestions
- Pork Belly Ramen: The ultimate ramen topping. A few crispy slices will make any bowl of ramen feel like it came from a specialty shop.
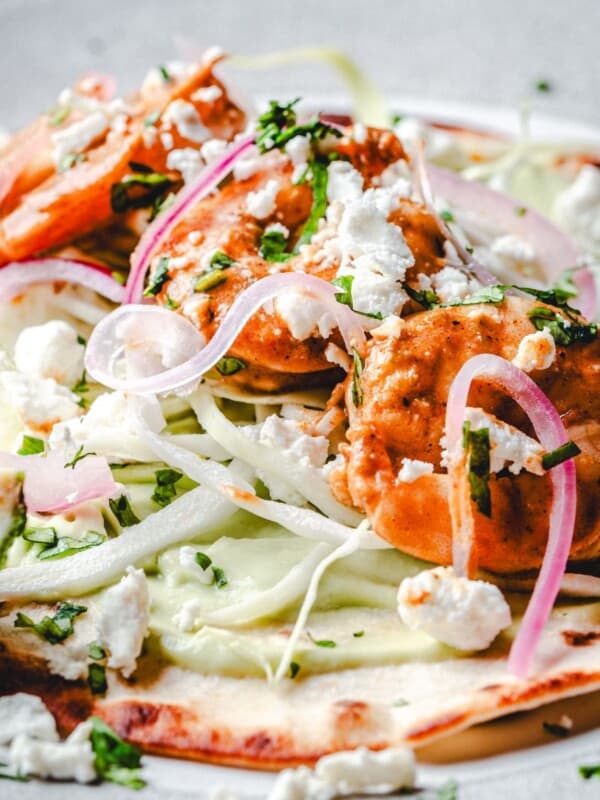
- Pork Belly Tacos: Add some pickled onions and cotija cheese for an incredible taco night.
- Pork Belly Sandwiches: A BLT becomes a PLT (Pork, Lettuce, Tomato) that is truly next-level. Also fantastic in Pork Belly Sliders.
- Pork Belly Fried Rice: Chop it into cubes for a rich and savory addition to your favorite fried rice recipe.
Make-Ahead and Storage
Store any leftover roasted pork belly wrapped tightly in an airtight container in the refrigerator for up to 4 days. You can also freeze it for up to 3 months.
The final step before serving is to sear the slices in a skillet to warm the pork belly and get those irresistible crispy edges. I recommend pan-frying because it’s fast and gives you total control so you can cook the slices up exactly as you like. Just slice the chilled pork belly and arrange the pieces in a cold, dry skillet in a single layer. Turn the heat to medium and let the fat slowly render out. Cook for a few minutes per side until the pork is heated through and gloriously crispy.
Your Questions, Answered
If your pork belly is still tough and/or chewy, it wasn’t cooked long enough. Because pork belly has a lot of connective tissue, it needs time to break down. At 275°F, it usually takes the full cooking time for that tissue to soften. If you pull it out too early or cook at too high a temperature at the beginning, it stays tough and hard to chew.
If you’re going for the Momofuku restaurant-style method, then yes, you need this step. Chilling the tender, rendered pork belly allows it to firm up, which is the only way to get clean, even slices. If you try to slice the warm meat, it won’t hold its shape and will fall apart in the skillet. This step is the key to the entire technique.
If you’re serving immediately as a roast: No. If you’re following the note to serve the skin-on pork belly as a small roast, simply let it rest for 10-15 minutes after it comes out of the oven, then slice and serve. If you’re following the Momofuku method, then yes. Searing the chilled slices renders the last bit of fat, deepens the flavor of the meat, and creates those irresistible crispy edges that are the hallmark of the Momofuku style.
Ask your butcher or grocery store meat counter for a center-cut piece of pork belly with even layers of fat and lean meat. You can buy it with the skin still attached or already removed; this recipe works either way.
I recommend roasting your pork belly in a standard oven, but the air fryer is a great way to reheat slices. To reheat the chilled slices in an air fryer, arrange them in a single layer and cook at 400°F for 3-5 minutes or until they’re as hot and crispy as you like.
More Amazing Pork Belly Recipes


Video
Ingredients
- 1 pound pork belly skin on or skinless
- 2 teaspoons fine salt or 4 teaspoons kosher salt
- 2 teaspoons sugar
- a few grinds of black pepper
Instructions
Prepare the Pork Belly
- For Skin-On Pork Belly: Pat skin dry with a paper towel. With a sharp knife, score through skin every 1/2-inch at a diagonal, cutting through skin and into fat, but not so deep that you hit meat. Repeat cutting in an opposite diagonal to create a diamond shape pattern. (See recipe note #1)
- For Skinless Pork Belly: Move on to the next step.
Season and Rest Overnight
- Season pork belly with salt sugar and a few grinds of black pepper. Cover and refrigerate overnight.
Roast Low and Slow
- Preheat oven to 450°F.
- Roast pork belly for 30 minutes on the middle rack in a heavy, oven-safe pan or skillet, skin side up / fat side up. Reduce heat to 275°F and roast for an hour or more, until tender but not mushy. (Larger pieces of pork belly will take longer. Our one-pound belly was done after an hour at 275°F.)
Finish and Serve
- To Serve as Crispy Slices (Momofuku-Style): Remove from oven and let cool to room temperature. Wrap tightly in plastic and refrigerate until chilled through – at least a few hours and up to 2 days. Once chilled, slice into thick pieces and brown in a skillet on the stovetop until crisp. Enjoy alone or in soups, salads, pasta sauces, ramen and more!
- To Serve as a Roast (Skin-On Alternative): Remove from oven and let rest 10-15 minutes before slicing. (See recipe note #2)
Notes
- Scoring: Scoring the pork belly skin allows it to crisp up and allows the seasoning to penetrate into the fat and meat below the skin.
- To Serve as a Roast: For the skin-on version, you can serve this immediately after roasting. Let the pork belly rest for 10-15 minutes before slicing and serving. This is ideal for a small roast for four.
- Storage: Store leftover chilled, roasted pork belly refrigerated in an airtight container for up to 4 days or freeze for up to 3 months.
- Serving Ideas: Be sure to check out my collection of Pork Belly Recipes for ways to use this delicious crispy pork belly!
Nutrition
Nutrition information is automatically calculated, so should only be used as an approximation.


My second question(s) as I try this recipe for my first time. I found your prior post about freezing it before or after cooking, so that is good to know. My problem is that I put it in the oven at 450 and the juices and I’m assuming the sugar in the pan has burned. I have the fans on and the door of the house open, but it’s smoky in here. So, I put a bit of water in the pan, which I know ruins the crispiness I’m in search of. Is it normal for the stuff in the pan to burn? I am using a 9×13 glass pan — should I not use glass? I also did not take the skin off, but from reading other comments, I’m assuming that’s not the issue. Any thoughts would be greatly appreciated.
Hi Kristen – sorry about the smoke! I haven’t had that issue, but always use a heavy pan like a cast iron skillet or ceramic coated heavy skillet. Perhaps it is the glass pan?
That’s what I’m thinking. Thank you for replying. I will use a cast iron pan the next time. I did make the ramen tonight! YUM! And I took the skin off the pork belly afterwards, crisped it up well on the stove, and mixed it in with the dogs food. The dog is very happy too tonight!
I’m so glad that it worked out, Kristen! And glad you made the ramen too – one of our favorites! Love it that your dog got an extra treat tonight too. 🙂
My sister recommended putting a bit of water in the pan, scewer the pork loin to sit above the water rather than in the water while its in The oven. Havent tried it her way yet but we’ll see.
Can you direct me to the post that talks about freeze thing pork belly before vs after cooking? I haven’t been able to find it.
I have my pork belly in the fridge after seasoning last night. It will go into the oven shortly. My question is whether, after you cook it, cool it, and slice it, can I freeze the slices? I’d like to be able to have them in the freezer and ready to take out and crisp up in the fry pan for a quick week-night Ramen dinner. What do you think?
Yes, you can absolutely freeze the slices for a quick meal later!
Hi there. I’m planning on cooking 2 lbs pork belly. How much longer should I cook it at the low temperature? Thank you.
Hi Aun! I’d recommend cutting the pork belly in half lengthwise before you begin and you will want to cook it longer at the lower temperature because of the extra weight. My best guess is 75-90 minutes. I’d love to hear how it goes!
Hi Marissa,
Thank you for this amazing recipe! I have two slabs that are almost 1 pound each (.8 lbs). How long do you recommend cooking them at 275? Thank you!
Hi, Bethany! I’d start checking them at 45 minutes during the 275˚F portion of cooking. My guess is that with two, they’ll still take the full hour. I’d love to hear how it goes!
Being in my mid-80s and alone I would love to try this. Wonder if the pork belly was made to your receipe and
served/eaten over a plate of commercially steamed asian veggies and maybe topped with shredded chedder would be fast delicious and something for a non-cook to enjoy? Your comment would be appreciated.
Hi, Al. Sure, feel free to use the cooked pork belly in any dish that you like. You might try the dish first without the cheese as pork belly is very rich on its own. Hope you enjoy!
Hi so I have made this several times and wonder what is the benefit of the salt and sugar? Is it like dry rub because I don’t taste anything when I cook it off. Otherwise this is a wonderful recipe and I have used for my ramen soup and made pork belly sandwiches in the puffy bread. Thank you.
Glad you’re enjoying the recipe! The salt and sugar do work as a dry rub to flavor the pork belly and also help it caramelize in the oven. 🙂
I lucked into a 1.25 lb slab of pork belly from my local butcher and followed this recipe with great success! It was my first time cooking pork belly and this was a great jumping off point. I made this last night to use in bahn mi style rice bowls (with cucumber, cilantro, mint, red pepper, and carrots). It received rave reviews from my spouse and we were both eager to devour the leftovers today. I did forget that you specify an overnight rest in the fridge, so I compensated by letting the rub sink in for an hour and a half at room temp before roasting. I also added 1 tsp of five spice blend to the rub. This will be my go-to for any future pork belly!
Sounds like a fantastic meal, Amanda! So glad you enjoyed the pork belly and love your twist of adding 5 spice blend! Thanks for coming back to let me know!
Hi! I just want to comment that when you buy the pork belly, be sure to request one large strip that = 1 lb. We brought home two strips that together equalled 1 lb and they cooked too fast with this recipe. My fault but thought I should let other users know! The flavor was great however and I’m going to get a new cut and try again. Thanks!
Hi Betsy! Thanks for the helpful tip! Glad you enjoyed the flavor… 😉
Is there a particular reason why you chill before you slice and serve? I make the momofuku pork buns and chill it for that recipe so it slices easier. But if I was roasting this to serve immediately would I really need to? I would probably cut a one pound chunk in half after cooking, and eat it like a pork chop. A deliciously devine pork chop. I cook belly a thousand ways, but was just curious about why to chill for this preparation.
Hi there, Chris. We’ve definitely eaten it right away as well – so melt in your mouth delicious! The purpose of wrapping and chilling is to make the pork belly easier to slice and crisp up in a pan for things like pork belly sandwiches and pork belly ramen.
Hi Marissa. First time making pork belly. I was just about to start cooking this recipe when I realized that the pork belly I bought had the skin on. Is there a way I can still make this with the skin on, or do I need to remove it or just buy another pound of it with the skin off. Thanks in advance!
Hi Edward – I haven’t made this recipe with skin-on pork belly, so I don’t want to give you bad advice about cooking it. If it were in my kitchen, I’d carefully remove the skin before following the recipe. Let me know how it goes! 🙂
I’ve made this recipe with skin-on pork belly. It was delicious, but was soaking in pork fat at the end of baking in the oven. If you use skin-on, just make sure you remove it from the pan immediately after taking it out of the oven, otherwise it’ll absorb all the fat. Pat it dry with a paper towel, then finish it as instructed in the recipe.
Thanks so much for the tips, Rich!
Hi Marissa, I made this recently and it was very good! I was just rereading as want to make it again and realise that your recipe says skinless – I made mine skin on and the crackling was amazing, so now a bit nervous of changing it. I came on here to ask if you score the skin (which I did) – have you made it with skin on? Can’t imagine that skin off would make it nearly as crispy (and making it for a dinner party so stuck with what to do! Maybe I’ll do one of each and enjoy the left overs….).
Hi Wendy! I’m so glad that you enjoyed the recipe and that the cracklings were so good! I say stick with what works! And if you ever try it with skinless, I bet you’ll enjoy it too.
Hi All, I’ve made this pork belly with the skin on and it turned out amazing. I didn’t score the pork belly, but I did poke it with a fork all down it’s length and then gave a light sprinkling of kosher salt on top, but leave all the other spices for the sides only. Turns out very crispy and delicious. When making for a party, I cut into 1/2 slices and serve right away. They’re always a hit on their own.
Thanks so much, Justin!
HI Marissa,
I just found this recipe, I’m trying to make a dish with this in it.
I did have a few questions. firstly would I have to cook this one at a time, or if was I making this for a party would I be able to make two as long as I space them out?
Would I be able to roast some mushrooms and garlic with underneath, or on the sides??
I’m thinking about loading them up in like a bread bowl type deal, and shredding some cheese on top.
Hi James. 🙂 Yes, you can make more than one, but do give each one its own space to brown. You’ll want to cook these at least several hours before you plan to use them – wrap them up tight and refrigerate until chilled through. Once you cut them in to slices and crisp them up in a pan, you can use them however you like.
I don’t recommend cooking the pork belly with other ingredients, like the mushrooms and garlic as it won’t allow the pork belly to get crispy, it would steam instead from the liquid of the other ingredients.
Hope that helps. Enjoy!
Sorry, it took so long for me to get back to you. So I did as you said and I cooked the veggies in the leftover juices instead and cooked them in like a walnut liqueur, and poured everything in a bread bowl and covered it with a cheese sauce. it came out delicious!!! I cooked another this past week and omg it came out amazingly!!! thank you so much for your reply
do you roast uncovered?
Hi, Lyle. Yes, I cook it uncovered. 🙂
Hey Marissa, cooking Pork Belly for the first time and found your recipe. I am in Jamaica so I have added a little dry rub and a toops of mushroom soy sauce to spice things up a bit. Will let you know how it turns out. Thanks. Brian
I’m trying this tonight! No oil or anything on the pan you put it on?
Fantastic! No need for oil in the pan… 🙂 Would love to hear how it goes.
Thanks for the recipe! I needed a little more help and details on the proper technique. I had been improvising with mixed results. Although I used 3 pounds sliced into 7 pieces it worked beautifully. I also added a little ground fennel, dry mustard and house BBQ spice rub.
That’s fantastic, Drew! So kind of you to come back and let me know. 🙂
Great technique! I was looking for ways to tweak my cooking method and yours was perfection.
Thought I’d add: If you’re looking for more of an asian twist, I like to incorporate a salpicao-esque marinade. I recommend using a combo of soy sauce (1/4 cup), Worcestershire sauce (However much you’d like to match the soy sauce but I like a good bit), two or three bay leaves, and red pepper flakes).
And if you like vinegar, I like to make a mixture of white and rice wine vinegar in a bottle, throw in slices of jalapeno and a couple garlic cloves for a spicy dipping sauce. Goes great with rice.