This post may contain affiliate links. Please read our disclosure policy.
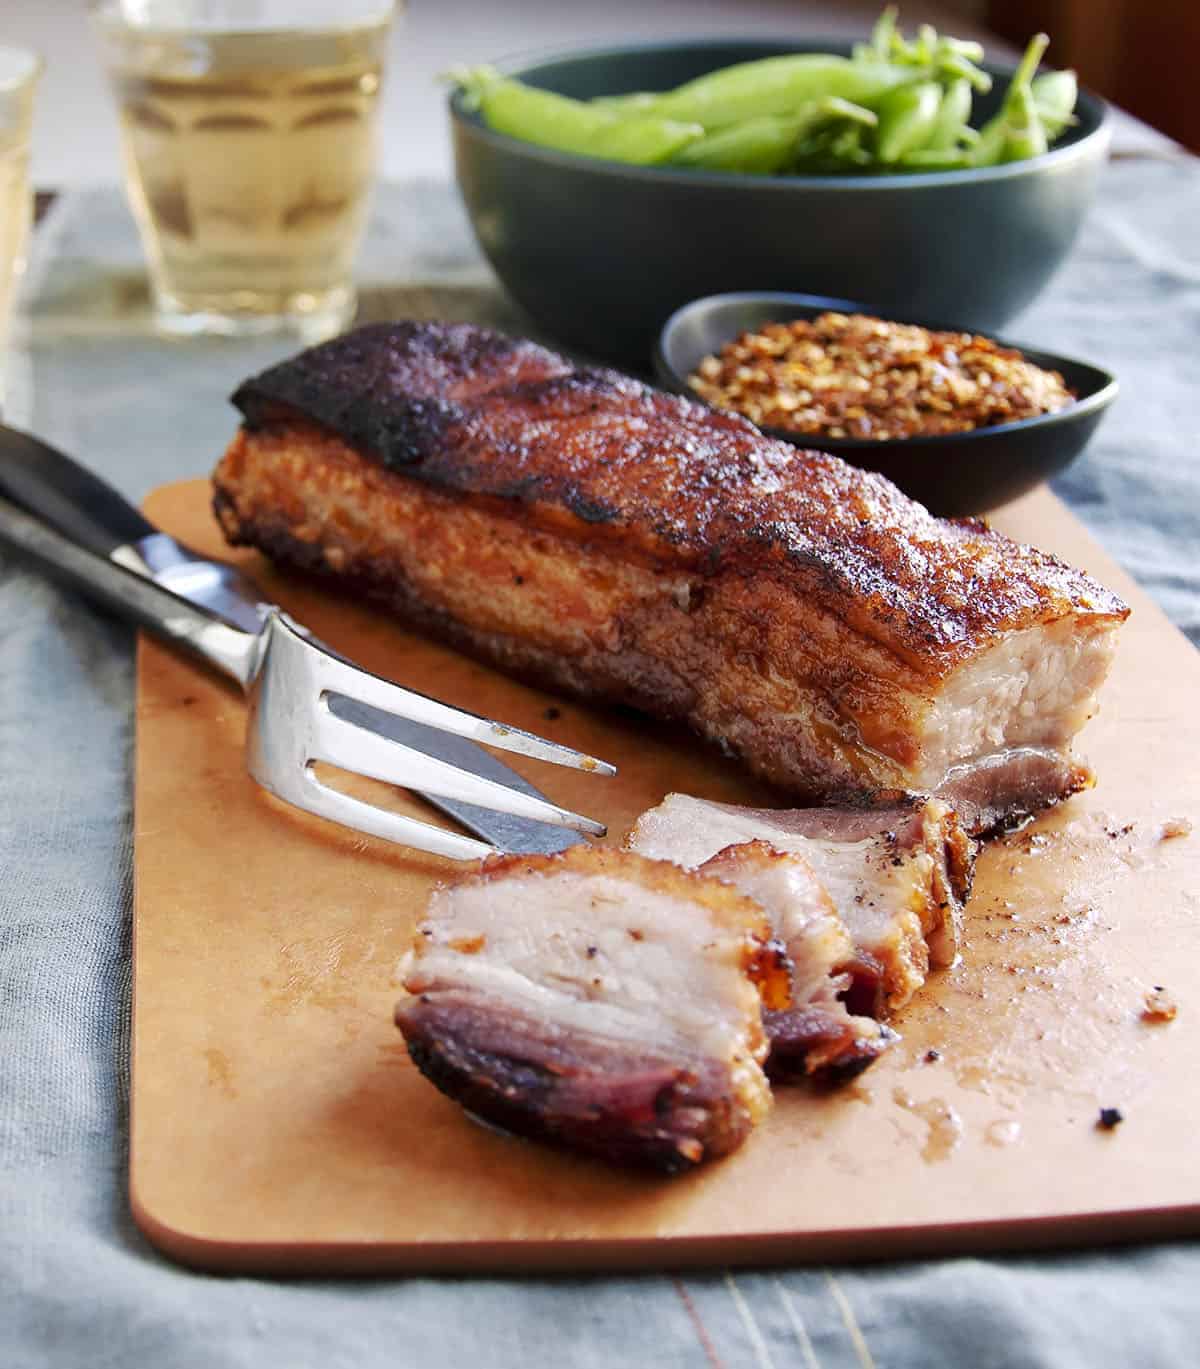
You need just 4 everyday ingredients to make Pork Belly that’s crispy on the outside, juicy and flavorful inside, and oh so versatile. It’s the kind of thing you taste in a restaurant and think it would be impossible to make at home – but it’s just the opposite. Enjoy it on its own, simply pan-fried, or as the star of countless dishes.

If you’ve had poorly cooked pork belly – chewy or otherwise unpleasant – you know that technique is important. After experiencing the melt-in-your-mouth version at David Chang’s Momofuku Noodle Bar in New York City, where they use it to top bowls of ramen, fill steamed buns, and crown noodle bowls, I was determined to recreate it at home. I turned to David Chang’s Momofuku: A cookbook, where he generously shares the method. To my surprise, the recipe was ridiculously simple! And the result? Unbelievably succulent and truly restaurant-quality.
This is a fantastic, simple recipe. I have made it twice now then also used your P.L.T sandwich recipe. It’s sinful! Thank you for sharing!!!
LINDSEY L
Table of Contents
Ingredients for this Pork Belly Recipe

- Pork Belly: skin-on or skinless (more on that below)
- Fine Salt: or twice the amount of kosher salt (Diamond Crystal brand, or an equal amount of Morton brand)
- Sugar: plain granulated white sugar
- Freshly Ground Black Pepper
Skinless vs. Skin-On Pork Belly


Chang’s original recipe calls for skinless pork belly, but this easy recipe works beautifully whether your piece has skin or not! The only difference is that if the skin is still intact, you’ll need to score it before roasting to get that perfectly golden brown and crisp crackling (crispy skin) and allow the seasonings to permeate the fat and meat. With the skinless variety, you’ll skip the scoring and go straight to seasoning. Either way, the result is delicious.

Pork Belly, Side Pork, and Bacon
Pork belly and side pork are the same thing – the terms are synonymous because a pig’s belly wraps around its sides. If you ask your butcher for either, you’ll get the same cut of meat.
Don’t confuse pork belly with bacon, though. Pork belly is a fresh, thick slab of meat cut from the pig’s abdomen, uncured and unsmoked. Bacon, while often made from belly, has been cured, smoked, and sliced. It can also come from less fatty back cuts. So while they start from a similar place, they end up as very different ingredients in your kitchen.

5 essential Recipe Tips
- Plan Ahead: Despite the fact that you’ll only have a few moments of active time, you’ll want to start the process three days ahead. You’re essentially dry brining the meat and it needs an overnight stay in your refrigerator to take on all of that wonderful flavor. Then (ideally) you’ll refrigerate overnight again after roasting and before slicing and crisping.
- When buying pork belly: No matter if it is skinless or skin-on, look for a slab that is close to an even thickness, and around one pound. If you have thin areas, they are more likely to burn during the first 30 minutes of roasting at 450˚F (No matter what, keep and eye on it during this first high-heat period to avoid burning.) Larger cuts will work, but will increase the cooking time.
- For the best texture: I recommend that you cook, then wrap and chill the pork belly overnight before slicing. This has a few benefits:
- It’s much easier to slice.
- It stays together beautifully when crisping up in a pan.
- Allows flavors to intensify and meld.
- (Confession: we almost always have a sample or two when it’s fresh out of the oven because it smells irresistible and tastes amazing!)
- Use the right pan: Be sure to use a heavy-bottomed, oven-proof pan or skillet for roasting (not a glass baking dish where the fat that renders will burn and smoke excessively).
- Get creative! This versatile ingredient shines in a variety of dishes. Try using it in ramen, tacos, sliders, or even fried rice for delicious and unexpected flavor combinations (recipe links below!).
How to Cook Pork Belly: Skin-On or Skinless
Step 1: For skin-on pork belly (for skinless, move on to the next step): pat skin dry with a paper towel and score skin with a very sharp knife on the diagonal about 1/2-inch apart. Repeat this cutting in the opposite direction to create a diamond pattern (see image below). Take care to make shallow cuts – it’s okay to go into the fat, but don’t cut so deep that you go into the meat.

Step 2: Season a one pound piece of pork belly (skin-on or skinless) with a dry rub of sugar, salt and pepper. Cover and refrigerate overnight.


Step 3: The next day roast in a heavy, oven-safe pan or skillet in a 450°F oven on the middle rack for the first 30 minutes and then an hour at 275°F. Remove from oven and let cool to room temperature. Wrap tightly in plastic and refrigerate until chilled through – at least a few hours and up to 2 days.


Step 4: Once chilled, slice into thick pieces and brown until crispy to enjoy alone or in a variety of recipes from salads (like Wedge Salad or Spinach Salad) to soups to sandwiches and more!


Oven Roasted Crispy Pork Belly

Video
Ingredients
- 1 pound pork belly skin on or skinless
- 2 teaspoons fine salt or 4 teaspoons kosher salt
- 2 teaspoons sugar
- a few grinds of black pepper
Instructions
- For skinless pork belly, move on to the next step. If using skin on pork belly, pat skin dry with a paper towel. With a sharp knife, score through skin every 1/2-inch at a diagonal, cutting through skin and into fat, but not so deep that you hit meat. Repeat cutting in an opposite diagonal to create a diamond shape pattern. (recipe note #1)
- Season pork belly with salt sugar and a few grinds of black pepper. Cover and refrigerate overnight.
- Preheat oven to 450°F.
- Roast pork belly for 30 minutes on the middle rack in a heavy, oven-safe pan or skillet, skin side up / fat side up. Reduce heat to 275°F and roast for an hour or more, until tender but not mushy. (Larger pieces of pork belly will take longer. Our one-pound belly was done after an hour at 275°F.)
- Remove from oven and let cool to room temperature. Wrap tightly in plastic and refrigerate until chilled through – at least a few hours and up to 2 days.
- Once chilled, slice into thick pieces and brown in a skillet on the stovetop until crisp. Enjoy alone or in soups, salads, pasta sauces, ramen and more! (recipe note #2)
Notes
- Scoring the pork belly skin allows it to crisp up and allows the seasoning to penetrate into the fat and meat below the skin.
- Store refrigerated in an airtight container for up to 4 days or freeze for up to 3 months.
- Be sure to check out my collection of Pork Belly Recipes for ways to use this delicious crispy pork belly!
Nutrition
Nutrition information is automatically calculated, so should only be used as an approximation.


Followed to a T. Skin was rock solid, and inedible.
Pork was tender in center, but not juicy by any stretch. Also very bland. A light brush with bbq sauce helped, but a poor recipe nonetheless
Oh no, Ron. I’m sorry this wasn’t what you were hoping for. The skin becomes very crunchy, i.e., turns into “cracklings”. The legend is that they got their name because a few people cracked their teeth on them. If they’re not for you, I recommend using skinless pork belly. On the juiciness, it sounds like your pork belly may have been pretty lean?
Do you season both sides of the pork belly or just the top?
Hi Connor! I season all sides of the pork belly.
a few notes to Connor and any less experienced cooks about ways to adapt or customize your version of this excellent pork belly master recipe. I’ve experiemnted a few times now following Marissa’s guide. Here’s what I’ve learned.
Cutting the belly in half (so it’s shorter) reduces twist and warp as they cook, makes them easier to handle, and allows you to fit them into different sized pans for cooking. The seasonings can be adjusted to suit any tastes. I dusted some 5 spice powder and a blast of cayenne in today’s effort, for fun. Very fragrant. Now to cooking.
Consider this technique: put a heavy cast iron pan on the stovetop. Wipe most of the rub off the pork belly (it will smoke less). Place the pork in the pan, fat side down, not crowded!!, then turn the pan on and slowly bring it up to medium hot. It will render some fat as it heats and guarantee a nice sear on the ‘presentation’ surface. It is much easier to control that stage of cooking on the stovetop. Once it’s nicely browned on the fat side, turn the belly in the pan to lightly brown the sides, then finally brown the bottom. With the fat side up, put the pan in the oven, but watch it creafully. You oven may not be much hotter than you think. Don’t overcook it! The cooking times I use are shorter than shown in the recipe above, and I generally turn the oven down from 430f (my ovens ideal setting for this recipe) to 275f after about 15 minutes, since it takes a while for the oven to cool down once you’ve had it at 450 for a while. Why turn it down after 15 minutes? So you don’t overcook it. Keep an eye on it. Once it’s done to your liking, cool it off with the fat side exposed; a bit of drying assists the final stage of cooking.
You can use the pork belly in a thousand ways. I save some of the cooking fat to crisp it up in a pan before serving it, but that isn’t necessary if you’re including it in soups, casseroles, or banh mi, etc etc…
Terrific recipe, Marissa. Everyone can do this and it makes an inexpensive cut luxurious (nestle thin slices over a slightly sweet/smoky celeriac puree for a bit of fine dining attitude if you like). Chang’s profound skill is on full display in this flawlessly simple preparation.
Hi Marissa! thanks so much for sharing this recipe! It looks really amazing. I have a pork belly slab in the freezer but I’ve already cubed them (about an inch and a half) Do you think I can still make this or do you think they will burn because they are so much smaller? Thanks!
Hi Terri! This is such a great question. I haven’t cooked small pieces like this, but if I were to try it, I would cut the cooking times in half. So 450°F oven for the first 15 minutes and then 30 minutes at 275°F. Even at that, I would keep an eye on it, particularly during the 450°F. Please let me know how it goes!
Hi Marissa,
Thank you for your suggestion. I cooked it today, as you suggested and it worked out really well! I flipped it after it browned to a crisp to prevent burning during the 450 degrees. After chilling and slicing, i sautéd it with Brussels sprouts and it had great flavor!
I am a Kitchen Manager and did Pork belly for the first time based on this recipe. I did a 6.5 – 7 pound piece. Seasoned with Salt,pepper,garlic,cayenne and brown sugar. Score the top fat then seasoned and Let sit overnight. About 22 hours. Then Seared it on the top and bottom on flat top grill. Put in oven on 450 for 30 minutes and another 45 on 275. Came out perfect!! Crispy on top and juicy!! The seasoning is great on it sweet and spicy. Letting it chill in the fridge tonight and serving as a simple sandwich with lettuce, tomato, onion. And sriracha mayo. It smells heavenly! Can’t wait to try it. Thank You. Thank You!!!
You are making me so hungry, Mark!! Glad you found the recipe helpful and made it your own. 🙂
Why should you use skinless pork belly?
Hi there! I typically make this recipe with skinless pork belly, but you’ll see in the comments that several readers have made it with success using skin-on pork belly that they’ve scored prior to roasting.
I was able to get pork belly from Costco, but they are cut into roughly 1/3lb slabs. I plan to cook up 4 of these slabs (1.3 lb). Since they are smaller slabs, any idea on how long to cook them? I’m afraid that cooking them the same amount of time as a single 1 lb slab will dry them out.
Hi Andrew! You’ll want to reduce the cooking time. I haven’t made this recipe with slabs smaller than a pound, but I would reduce the hot oven time (450˚F) to 15-20 minutes, and start checking the belly after 30 minutes at the cooler temp (275˚F). You want it to be tender but not mushy. Let me know how it goes!
Went well. I did pretty much what you recommended (before seeing your reply). It’s a winner!
So glad it went well, Andrew! Thanks for coming back to let me know.
I also buy my belly from Costco. I do not buy the pre-sliced belly but the whole belly. I then slice mine into 2-3 lb pieces. This still works great with this recipe.
That’s so great, Jason. Thank you for coming back to let me know!
If you want to crisp up the skin without cooking the pork belly, you can try heating oil up to 450F or so and ladling it over the skin of the pork belly. The oil will crisp it right up. Be VERY careful when doing this though, make sure the ladled oil has a safe reservoir to collect in and make sure you wear thick, protective clothing to prevent splashed oil from burning you.
I love this! Just love this. I just can’t figure out how to prevent the bottom from turning black (burning). Also is cooling it a necessary step? Sorry if you answered this before.
Hi, Julian! Are you talking about the splatter turning black or the actual pork belly? The sugar does tend to get deeply caramelized on top, but the bottom shouldn’t be burned. Be sure to use a heavy bottomed pan (like cast iron), not glass. The cooling step allows the pork belly to return to a more solid texture making it much easier to slice. Hope that helps!
Hello! What do you mean on the last step when you say to brown after you cool? In the oven or on the stove?
Hi, Matt! I recommend browning slices in a skillet on the stovetop. I’ll fix that in the recipe wording so it’s more clear. Thank you!
Hello! Wondering if the cooked pork belly can be frozen and thawed/browned in a skillet as needed? I tend to cook up big batches of this delicious stuff!
Hi Veronica! (That’s my middle name. 🙂 ) Yes, you can certainly freeze and then thaw and brown as needed. I recommend using it within 3 months for the best flavor!
This looks great and you can do so many things with it! I have a lot of mouths to feed and need a bigger roast….. how long should you cook a 7/8lb pork belly?
Hi Karlie! Yes, SO versatile! I would cook the pork belly in a couple of batches in a large, cast iron skillet. First I would cut the 8-pound piece of pork belly into 4, 2-pound slabs and then cook 2 slabs at once (repeating with the remaining 2 slabs). Let me know how it goes! 🙂
Want to cook this for a dinner tomorrow!!! I have 5lbs of pork belly.
Do you think i can do this in a simple aluminum tray or glass pyrex?
After the roasting is done and refrigerated, do you wait until it’s room temperature to brown in? is it in all 4 sides? Do you do it in a pan? thank you!!!
Hi there! You’ll want to cook it in a heavy, oven-safe pan or skillet, not the glass dish. I don’t wait until it’s room temperature, just slice and crisp it up in a pan. It’s fully cooked, so you can brown it to whatever degree you’d like. Enjoy!
Thank you!!! 🥰😊
We made this for ramen and it was AMAZING!!! Will absolutely be making this again and again and again!
I love to hear that, Ashley!! Thank you for coming back to let me know.
Thank you very much for this recipe – I’ve been looking for a way to get the pork belly crispy outside and tender inside for a long while. Your recipe is just what I needed:) I did make a few modifications though (sorry) – I omitted the sugar (husband is on keto diet) and sprinkled with salt, pepper, smoked paprika. I also used my air fryer instead of the oven…400 degrees for 23 mins, then 275 degrees for 30 mins. It came out spectacular – I didn’t even get to save and re-fry for sandwiches since my husband polished off what I made!
So glad that you and your husband enjoyed it, Christina! So sweet of you to come back and let me know!
I have now used this recipe/guidance to cook pork belly at least a half dozen times and it always turns out great; it can really make people think you know what you are doing! FWIW I’ve modified the spice mix a couple times and added some smoked paprika and used a combination of brown and white sugar.
So glad you’re enjoying this recipe and making it your own!!
We subbed maple syrup for sugar but used the same cooking technique and it was truly one of the most beautiful, tender and flavorful pieces of pork ever.
That’s fantastic, David! So glad it turned out so well! Love the idea of swapping in maple syrup!
Your friends have a pig ranch!? How amazing is that!! Im jealous! Whenever I see pork belly I always think of kakuni since I had to make pounds and pounds of it daily at a restaurant I worked at (a long time ago!). The thought of braised pork belly kinda makes me cringe, but your crispy roasted pork belly is giving me LIFE! It looks totally amazing, Marissa!!! Nothing like the pork belly of my past! I can’t wait to make this!!!!! Pinned!